If your classic car’s battery is dying and your Powermaster Powergen alternator isn’t charging, you’re not alone. Many car owners encounter this issue after installing a Powergen, especially in custom or vintage vehicles. But don’t worry. There are a few common reasons a Powermaster Powergen may not charge properly, and most of them can be fixed with basic tools and a little patience. This guide breaks down the most likely causes, provides step-by-step troubleshooting tips, and shows you how to get your charging system back on track.

What Is the Powermaster PowerGEN?
The Powermaster PowerGEN is a modern alternator designed to look like a traditional generator. It’s perfect for hot rods, muscle cars, and classic builds where you want the vintage look but need modern performance. While it’s a significant upgrade, like any electrical component, it can run into issues, especially if not wired or appropriately grounded.
Common Signs Your PowerGEN Isn’t Charging
Here’s how to tell if your PowerGEN alternator isn’t working:
- Battery voltage drops while the engine is running
- Headlights dim at idle or flicker
- The battery light or charge indicator stays on
- You hear a whining noise from the alternator area
- The car struggles to start or won’t start after sitting
If any of these symptoms sound familiar, it’s time to troubleshoot.
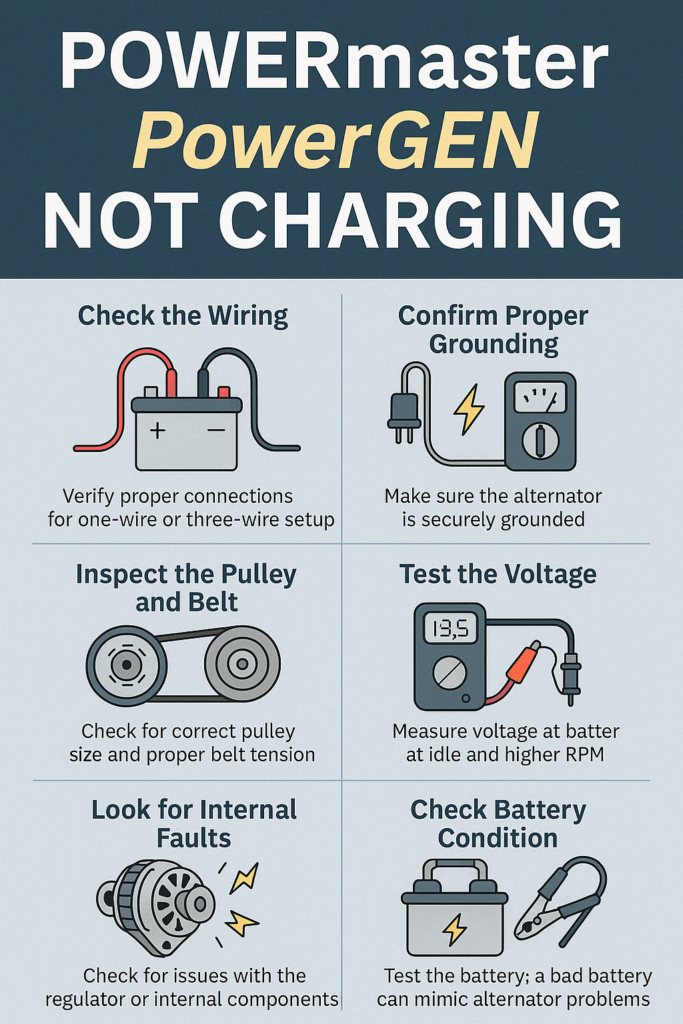
1. Check the Wiring
Start with the basics. Most Powergen units are one-wire or three-wire alternators, and incorrect wiring is the most common issue.
One-Wire PowerGEN
- Make sure the charge wire (usually a thick red cable) runs directly from the alternator output post to the battery or starter solenoid.
- Ensure it’s tight, clean, and corrosion-free.
Three-Wire PowerGEN
- Wire #1: Exciter wire (from the ignition switch or warning light)
- Wire #2: Voltage sense (can be tied to battery or output terminal)
- Wire #3: Main output
Pro Tip: Use a voltmeter to confirm power at the output post while the device is running. It should read 13.5–14.5 volts. If it’s still 12v or less, it’s not charging.
2. Confirm Proper Grounding
The PowerGEN must be securely grounded to function correctly.
- Check for rust or paint between the mounting bracket and the engine block.
- Add a dedicated ground wire from the alternator housing to the frame or battery if needed.
- Verify continuity with a multimeter from the alternator case to the battery negative terminal.
A weak or missing ground is a widespread cause of no charge.
3. Inspect the Pulley and Belt
The alternator needs to spin fast enough to create voltage. If the pulley is too large or the belt is loose:
- The alternator may not spin fast enough at idle.
- The belt may slip under load, causing low output.
Make sure the:
- The belt is tight (but not too tight).
- The pulley size matches your engine’s RPM range.
- Pulley grooves match the belt profile.
4. Test the Voltage at Idle and Higher RPM
Some PowerGEN models require higher RPM to “kick on” or start charging. This is especially true for one-wire setups.
- Start the car and measure the voltage at the battery.
- Rev to around 1,200–1,500 RPM and see if the voltage jumps above 13v.
If not, check the field excitation wire (on three-wire models).
If voltage rises after revving, your alternator may be functioning normally, but it needs a higher startup RPM.
5. Look for Internal Faults
If everything looks good on the outside, the issue may be inside the PowerGEN unit:
- Bad internal voltage regulator
- Worn brushes
- Failed diode or rectifier
- Damaged rotor/stator
At this point, consider:
- Taking the alternator to a shop for bench testing.
- Contacting Powermaster support (they’re responsive and helpful).
- Requesting a warranty inspection or replacement, if applicable.
6. Check Battery Condition
Sometimes it’s not the alternator—it’s the battery.
- A weak or dead battery won’t accept a charge properly.
- A shorted cell can fool you into thinking the alternator failed.
Use a battery tester or take it to an auto parts store for a free test.
A healthy battery should read 12.6v or higher when fully charged and the engine off.
Extra Tips for Reliable Charging
- Use heavy-gauge wire for your main charge cable (4 AWG or larger).
- Add a voltage gauge inside the car to monitor performance.
- Clean terminals and connectors regularly.
- Don’t rely solely on a warning light—use a multimeter when troubleshooting.
READ MORE – Lunch Bag with Charger: The Smart Way to Power Through Your Day
FAQs:
- Do I need a warning light for a PowerGEN to work?
No, but on a three-wire system, the exciter wire can be connected to a light or ignition circuit to help with startup charging. - Why is my PowerGEN not charging until I rev the engine?
One-wire alternators often need higher RPM (1,200–1,500) to begin charging. - Should the voltage go above 14v when running?
Yes. A properly working PowerGEN should show 13.5–14.5v while running. - Can I test my PowerGEN alternator at home?
Yes. Use a multimeter to check the voltage at the battery before and after starting the engine. - What if the alternator passed bench testing but still won’t charge?
Check for insufficient grounds, incorrect wiring, or a failing battery. It may not be the alternator’s fault.
Conclusion:
A Powermaster PowerGEN not charging can be frustrating, but it’s usually something simple. Start with wiring, check your grounds, and work through the basics before assuming the alternator is bad. Whether you’re running a hot rod, a restored classic, or a street machine, the PowerGEN is built to last. With proper setup and maintenance, it should deliver reliable performance and that vintage look for years to come.


